![]()
Beautiful Plants For Your Interior
![]()
Beautiful Plants For Your Interior

How to find out my soil type is part 1 in a series of posts on garden soils. Part 2 looks at the pH testing of soil in 4 easy ways and the final part, part 3 details how to improve your soil for gardening with tips and ways one can improve your own soil in the garden.
Our buyer’s guide highlights some of the best soil pH testers on the UK market today which will help you determine the pH of your soil.
However, in this first post, we explore the types of soil, soil structures and soil textures, how they are made up, and finally how to easily find out the ‘soil type’ and texture in your own garden and or allotment, using a few ‘easy’ uncomplicated methods. This is the first step in our process on how to find out my soil type.
In further posts, we will look at soil testing (Ph levels), soil improvers (organic matters), and how we can improve certain types of soils and we will be looking at the different plants that grow best in certain types of soils.
Generally, we know that a good base or sound preparation for any activity or task ensures that any further or additional efforts put into such activity will certainly pay dividends.
It is no different when getting the soil ready for the garden or allotment to plant. Any experienced gardener will tell you the foundation for all our gardening efforts going forward in the weeks, months, and years to come is the soil beneath with which we work.
What work we put in at the beginning, will ensure all our efforts both physical and financial will be rewarded in the future.
Soil is perhaps different things to different groups of people. As gardeners (and as discussed within this post) when we talk about soil it is the first 40-50cm (15-20in) from the surface that we class as the soil.
Soil type refers to the physical and chemical characteristics of the soil in a particular area. Understanding your soil type is important because it affects the growth and health of plants. The three most important pieces of information to know about your soil type are its texture, fertility, and acidity level.
There are generally accepted to be 6 main types or groups of soil: loamy, clay, sandy, peaty, chalky, and silty soils. All have different structures and textures.
Clay soils are heavy, high in nutrients, wet and cold in winter baked hard and often cracked in a dry hot summer. Holds moisture well, but drains slowly.
Sandy soils are light, dry, warm, low in nutrients and often acidic. Sandy soils drain quickly after rain or watering.
Silt soils are fertile, light but moisture-retentive, and easily compacted.
Loam soils are mixtures of clay, sand and silt that avoid the extremes of each type.
Peat soils are very high in organic matter and moisture.
Chalky soils are very alkaline and may be light or heavy.
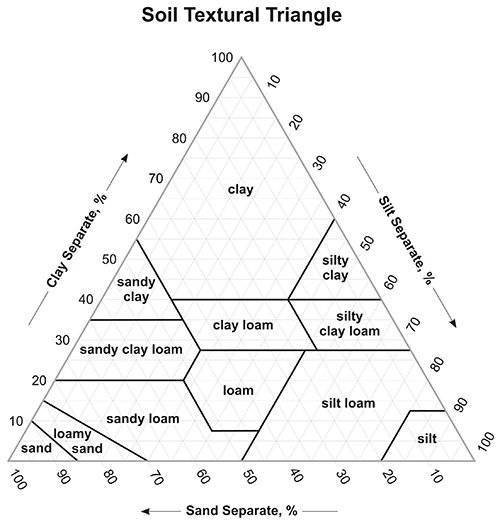
Let’s look at a couple of texture examples; the mineral mix forming the ‘texture’ of clay soil is made up of approximately 15% silt, 15% sand and 70% clay, whereas the texture of loam soil is made up of 20% clay, 40% silt and 40% sand.
Look at the infographic to the right to see Silt, Clay, Sand and Loam soil texture makeup percentages. You see Loam is a well-balanced texture, having the qualities of the others.
Therefore, let’s set about our first task then, on our journey to soil excellence. Let’s try and determine which ‘type’ of soil from the list above we have in our garden or allotment. As once we know which type of soil we have; we can then set about preparing that soil correctly.
We can use a couple of easy and inexpensive methods to determine our garden soil type and texture.
Method 1: The Feel Test
Take a small amount of your soil in a pot and add a small amount of water to dampen the soil. Make sure all the stones and bits of root are removed as well before undertaking this exercise.
A quick tip: If you think you have chalky garden soil, then place the soil sample in a small amount of vinegar. If it ‘froths’ then it contains free calcium carbonate (chalk) or limestone and is lime-rich due to the release of carbon dioxide.
Do not skip this first and most basic of exercises, it may seem insignificant now, but it is an especially important part of the ‘whole’ exercise for soil improvement.
Method 2: The Mudshake Test (Soil Texture)
Now we are getting a little bit more scientific but still an extremely easy and accurate method of how to find out the ‘soil texture’ in your garden.
For this method to work you will need the following equipment
The soil texture by simple definition consists of % sand, % silt and % clay and those 3 parts added together make up 100% of your soil texture.
Now, let’s check out this video below to see ‘how to find out my soil type’ using the ‘Mudshake’ test method together with how to use the soil texture triangle. Both are easy and provide quick results.
The map viewer from the UK Soil Observatory (UKSO) enables you to look up the soil conditions in your area. It also provides easy access to soil maps. You can examine soil property details from multiple data providers and you can also offer up information regarding the soil in your area.
The frequency of soil testing depends on several factors, such as the type of plants you are growing, the type of soil you have, and the history of your soil. In general, it is recommended to test your soil every 2-3 years to check the pH level and nutrient content.
However, if you notice any problems with your plants, such as stunted growth or yellowing leaves, you may need to test your soil more frequently.
There are several natural ways to test your soil. One method is to observe the plants that are growing in it. Different plants thrive in different soil conditions, so if your plants are struggling or not growing well, it may indicate that your soil is lacking in certain nutrients.
You can also check the soil texture, pH level, and nutrient content using homemade solutions or kits. For example, a simple pH test can be done by adding baking soda and or vinegar to a soil sample. Try mixing half a cup of vinegar with some soil. If it fizzes or bubbles, your soil is alkaline. Alternatively, mix half a cup of water with some soil, and add baking soda. If it fizzes or bubbles, your soil is acidic.
If neither reaction occurs, your soil is balanced, or neutral.
If you have reached this point in the post ‘how to find out my soil type‘, you should have a very good idea of the soil type and texture in your own garden and or allotment.
At this point, it will be best to note this information down somewhere safe with the date, as you can come back to this periodically over the coming weeks, months, and years to see how your soil changes over time as you repeat the exercise, as you improve your soil going forward.
Now let’s move on to Part 2, which looks at the pH testing of soil