Beautiful Plants For Your Interior
Vermiculture for Beginners: A Comprehensive Guide to Worm Farming
Vermiculture for beginners, or worm farming for beginners, is a fantastic way to turn your kitchen scraps into valuable compost. As we explained in our post ‘What is the Difference Between Vermiculture and Vermicomposting‘ by using composting worms to recycle organic waste, you create nutrient-rich vermicompost that can greatly enhance your garden’s health. Whether you have a small balcony or a spacious garden, setting up your worm bin is both simple and rewarding. Check out our post on the best wormeries or worm bins for starting your vermiculture journey.
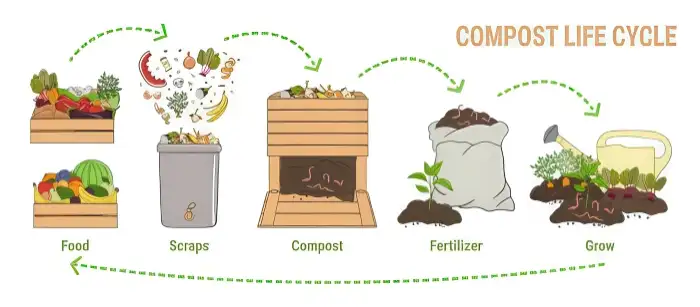
Vermiculture for Beginners: The cycle of life vermiculture provides.
Many beginners worry about caring for their worms, but managing them is straightforward. You only need to feed them the right materials and maintain suitable conditions.
Understanding vermiculture can transform how you approach composting, making it an enjoyable part of your eco-friendly journey.
- Vermiculture effectively recycles organic waste into compost.
- Setting up a worm bin requires minimal space and effort.
- Proper feeding and care ensure healthy worms and rich compost.
Understanding Vermiculture
Vermiculture focuses on using worms to transform organic waste into high-quality compost. Key aspects include understanding vermiculture’s history and basic principles and the importance of choosing the right worm species for effective composting.
History and Principles of Vermiculture
Vermiculture dates back thousands of years, with early examples found in ancient civilisations like Mesopotamia. Farmers noticed that the soil enriched by ‘worm castings’ (ie..worm poop) resulted in better crop yields. Today, we understand that worms break down organic matter through a process involving microbes and bacteria, alongside their digestive capabilities.
To aid this breakdown of organic matter, the most commonly used worm species in vermiculture today are Red Wigglers (Eisenia fetida) sometimes called ‘Tiger’ worms, not to be confused with the Tiger worm, Dendrobbaena (Eisenia hortensis).
Red Wigglers thrive in composting environments, consuming large amounts of food while reproducing quickly. Their ‘castings’ are nutrient-rich, making them ideal for your garden. By harnessing these natural processes, you can create a sustainable method for reducing waste and improving soil health.
Importance of Worm Species
Selecting the right worm species is crucial for successful vermiculture. As identified above Red Wiggler worms are well-suited for composting as they can live in confined spaces and eat a variety of organic materials. They thrive in temperatures between 59-77°F (15-25°C) making conditions manageable for most indoor setups as well as outdoor setups.
It should be noted: Another species you might encounter is the Redhead worm (Lumbricus rubellus). While it’s effective, it is best suited for outdoor composting rather than confined spaces indoors.
Therefore, when starting your worm farm, aim to buy Red Wigglers (Eisenia fetida) for optimal results. Their ability to convert kitchen scraps and garden waste into valuable compost makes them a popular choice among both beginners and experienced composters.
Setting Up Your Worm Bin
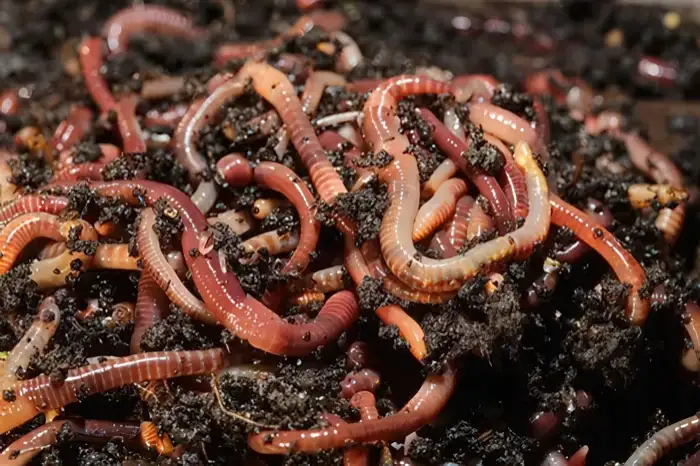
Worm Farming for Beginners: Red Wigglers (Eisenia fetida) are the perfect worms for vermiculture.
Creating an effective worm bin is essential for successful vermiculture. You will need to choose the right bin/s which you can buy online, or make yourself, (there are many videos on YouTube for this), create suitable bedding, and maintain proper moisture and pH levels. Each of these elements contributes to a healthy environment for your worms.
Choosing the Right Bin
When selecting a bin for your worms, plastic bins are a popular choice. They are lightweight, easy to clean, and can be found in various sizes. A basic 13gal (60ltr) plastic storage bin is ideal for you as a beginner. If possible choose bins that are ‘stackable’ as often you will place maybe 3, one on top of the other once you get going.
Ensure the bins have adequate ventilation. You will need to ‘drill’ a series of small holes around 1/4in (7mm) in the lids and sides for air circulation. ‘Elevating’ the bottom bin (a couple of bits of wood or bricks) can help with drainage if you need to fit a barrel tap. This ‘tap’ allows excess moisture or ‘worm leachate’ (not to be confused with worm tea) to be ‘drawn’ from the bottom bin, preventing a soggy environment that harms worms.
Check out our post ‘What’s the difference between worm leachate and worm tea?’
Creating the Perfect Bedding
‘Bedding’ serves as a habitat and food source for your worms. Good bedding materials include shredded newspaper, egg cartons, Autumn brown leaves, cardboard, and or coco coir. Aim for a mix of brown and green materials to mimic natural conditions. I start all my beds off with ‘shredded paper’, I use a cross-cut shredder to shred my paper, cardboard I cut by hand (depending on thickness).
Once you have your bin ready, place about 4-6in (10-15 cm) of ‘bedding’ at the bottom of your bin. Moisten the bedding lightly until it feels like a damp sponge. Too much moisture can lead to drowning worms or odour issues.
The ideal bedding promotes a thriving ecosystem. I also cover my ‘bedding’ in 1-2in (25mm-50mm) of compost to help start the ‘decomposing’ process, as compost already has the necessary microbes in it. Your ‘worms’ when purchased or perhaps given to you will also have microbes all over them and be in a ‘suitable’ mix. Now the fun bit, place all your worms in the bin. You should have around 500 -1000 worms to start your bin. No food yet!
Maintaining Moisture and pH Levels
Humidity is crucial for your worm bin. Worms thrive in a moist environment, around 60-70% humidity. Regularly check the moisture level by feeling the bedding. If it feels dry, mist it with a water bottle.
The pH level also affects worm health. Aim for a neutral pH of 6.5 to 7.0. You can easily test the pH using simple soil pH testing kits. Just take a little of the ‘castings’, mix it well with water in a jar, let it settle for 5 minutes place a ‘test strip’ in the water pull it out and read off the scale.
If it’s too acidic, adding finely ‘crushed’ eggshells can help balance it out. You can ‘finely’ grind egg shells in a ‘food processor’ or ‘pestle and morter’ Regular monitoring will keep your worms happy and productive.
Feeding and Managing Your Worms
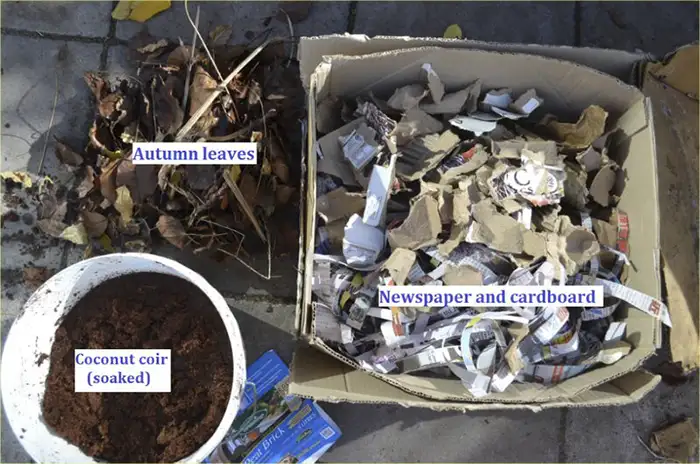
Vermiculture for Beginners: Have a ‘balanced’ mix of worm bedding if possible, however, we know it’s not always possible.
You have your ‘worm bin’ and bedding ready, your worms have been placed in your bin and are settling in, in their new home for the last 48 hrs, now we can start to feed them.
Proper feeding and management are crucial for the health of your composting worms. You need to provide the right foods and avoid overfeeding to prevent issues like pests and unpleasant odours.
What to Feed Your Worms
Worms thrive on a diet rich in organic materials. Suitable options include:
- Fruit scraps such as apple and banana peels, melon and other soft fruit.
- Vegetable waste like tomatoes, carrot peel and wilted greens like lettuce or cabbage.
- Coffee grounds and tea bags (remove any staples from tea bags)
Avoid feeding them acidic foods, if possible (or keep it to an absolute minimum if you must) such as citrus peels and onions, as these can harm the worms if given too much. I do not give my worms any acidic food.
Introduce new foods gradually and chop them into smaller pieces to help the worms consume them more easily. Make sure to balance their diet with a variety of food scraps to keep your worms healthy.
Avoiding Overfeeding and Pests
To keep your worm farm healthy, it’s essential not to overfeed. Here are some guidelines:
- Start with small amounts of food and monitor how quickly your worms consume it.
- Aim for a feeding schedule. This could be every few days, depending on the size of your worm population.
Watch for signs of ‘overfeeding’, such as a strong smell or the presence of fruit flies (not normally a problem if kept indoors). If this happens, reduce the amount of food you’re offering. Cover the food with damp bedding to keep pests at bay and maintain moisture. Regularly check on your worms’ health to ensure they are thriving in their environment.
I ‘cover’ my worms (inside each bin) with a single layer of old hessian sack I cut up, but a sheet of newspaper will do. This helps not only with the smells if you have overfed and keeping out fruit flies but also with moisture retention, as indicated above. If the bin starts to ‘dry’ out, I spray the hessian with water to keep it and the worms damp and healthy.
Harvesting and Using Vermicompost
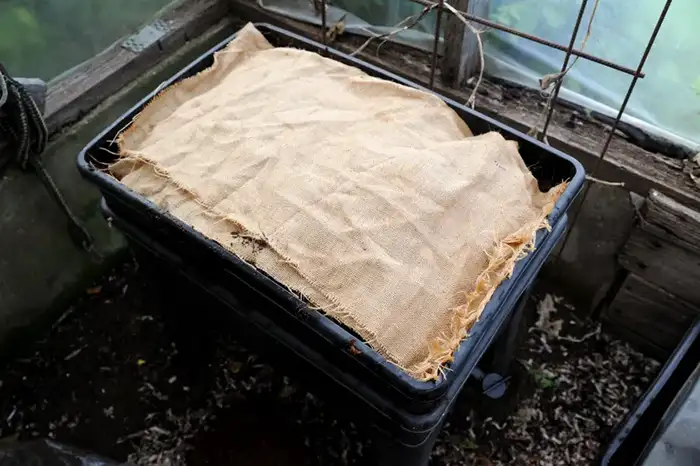
Vermiculture for Beginners: I place wetted ‘Hessian’ sacks over the worm bins to help with any smells, flies and moisture retention
Harvesting vermicompost is a vital step in the vermiculture process. It involves separating the nutrient-rich ‘castings’ from the worms and using the compost effectively in your garden. Understanding this process can help you maximise the benefits of your worm farm.
Separating Worms from Castings
To separate worms from castings, you have several methods. One common technique is the ‘pyramid’ method, where you place your castings in a pyramid shape. Light exposure will cause the worms to move down, allowing you to collect the top layer of castings easily without worms in it.
Another method I use involves using a garden ‘sifting’ screen. Pour the castings onto the screen (6-9mm screen) and gently shake it. The smaller castings will fall through, leaving larger worms behind. Be careful not to damage the worms during this process.
Benefits and Uses of Vermicompost
Vermicompost offers numerous benefits for gardening including the ability to make a natural liquid fertiliser called ‘worm tea‘ in the gardening fraternity. It is a nutrient-rich compost that enhances soil quality. The ‘castings’ contain vital nutrients like nitrogen, phosphorus, and potassium.
Using vermicompost as a soil amendment improves soil structure and supports beneficial microorganisms. You can mix it with potting soil or garden soil at a ratio of about 1:4 for optimal results.
In addition to promoting plant growth, vermicompost acts as an organic fertiliser. It helps plants resist pests and diseases, making it suitable for a wide range of plants. Plus, it retains moisture in the soil, which is essential during dry spells. By incorporating vermicompost into your gardening routine, you will see healthier plants and improved yields.
Troubleshooting Common Issues
When starting with vermiculture, you may face specific challenges. It’s important to address these issues promptly to maintain the health of your worm population and the effectiveness of your composting process. Here’s how to tackle common problems effectively.
Managing Worm Population Growth
Worm population growth can become unmanageable if not monitored. You must ensure your bin accommodates the number of worms you have. A good rule is to have about 1lb (.45kg) of worms for every lb of organic material you add weekly.
If your worm population grows too large, it can lead to overcrowding. To manage this, consider separating some worms and starting a new bin. This allows for better airflow and prevents stress. Regularly check if your bin has enough food, as insufficient diets can also affect growth.
Dealing with Unpleasant Odours
Unpleasant odours can be an issue in worm bins. This usually indicates a problem with the organic material or moisture levels. To reduce odours, first check for anaerobic conditions; these occur when there is excess moisture or not enough oxygen.
Start by adding dry bedding, like shredded newspaper or cardboard, to absorb excessive moisture. Also, ensure you’re not overfeeding worms, as leftover food can rot and create smells. Regularly turning the contents helps aerate the bin and introduce necessary microbes to aid decomposition.
Controlling Moisture and Pests
Maintaining proper moisture levels is crucial for your worms’ health. Too much moisture can create a ‘soggy’ environment, while too little can dry out your worms. Aim for a moist, sponge-like consistency in your bin.
If you notice pests, such as fruit flies, this could also be due to excess moisture or food. To combat this, add dry materials to balance moisture and cover the surface of your bin (see above, hessian sack). You can also use garlic or diatomaceous earth to deter pests. Monitor your bin regularly, as adjustments may be necessary as conditions change.
Conclusion
In conclusion, vermiculture for beginners offers a rewarding and sustainable way to manage organic waste while producing valuable compost. Starting small, understanding the basic needs of your worms, and maintaining a balanced environment is key to success.
By following the simple steps outlined, anyone can embark on this eco-friendly journey and reap the benefits of vermicomposting. With a little patience and care, vermiculture production can become a fulfilling hobby and contribute to a healthier planet. So, don’t hesitate – give it a try and witness the power of worms transforming waste into black gold!
FAQ’s
My worms seem to be congregating at the top/bottom/sides of the bin. Is something wrong?
Worm behaviour can tell you a lot about the conditions in your bin.
Congregating at the top: This often indicates too much moisture or not enough oxygen. Add more dry bedding and gently fluff the existing bedding to improve airflow.
Congregating at the bottom: This could mean the bin is too dry, or they’re trying to escape heat or light. Moisten the bedding slightly and ensure the bin isn’t in direct sunlight or near a heat source.
Congregating on the sides: This is usually a sign the bin is too acidic. Add a handful of crushed eggshells or garden lime to balance the pH. It could also simply mean they’re exploring or avoiding food that’s been placed in a concentrated area. Try spreading food scraps more evenly.
I’m going on holiday. How do I care for my worms while I’m away?
Worms are relatively low-maintenance, which is great for holidays! For short trips (a week or less), you likely don’t need to do anything special. Just ensure they have a good supply of food and moisture before you leave. For longer trips (two weeks or more), you have a few options:
Pre-feed: Give them a generous amount of food, focusing on slower-decomposing items like cardboard and dried leaves, before you leave.
Moisture Retention: Add extra bedding and consider placing a damp cloth or newspaper on top of the bedding to help retain moisture.
Worm Sitter: If possible, ask a friend or neighbour to check on your worms, adding a little water if needed and making sure they haven’t escaped.
Cool Storage: If it’s not too hot, you can move the bin to a cooler location to slow down their metabolism and reduce their food needs. Avoid freezing temperatures, however.
I accidentally added too much food to my bin. What should I do?
Overfeeding is a common beginner mistake. If you’ve added too much food, it can lead to sour smells, and anaerobic conditions, and potentially harm your worms. First, stop adding food immediately. Gently remove any large chunks of uneaten food that are starting to rot. Add a generous amount of dry bedding (shredded cardboard, coconut coir, etc.) to help absorb excess moisture. You can also introduce some extra red wigglers from another source if you have them, as they’ll help process the excess food more quickly. In severe cases, you may need to remove some of the bedding and start with a smaller amount of food in a fresh section of the bin.
