![]()
Beautiful Plants For Your Interior
![]()
Beautiful Plants For Your Interior

Regular visitors to our UK gardens in Springtime besides the Birds and the Bees are Butterflies. The UK is home to a total of 59 different species of butterflies. Among these, 10 are common butterflies to our gardens, and including these 10, a total of 57 species are our permanent residents in the country, while the remaining two species the Painted Lady (Vanessa cardui) and the Clouded Yellow (Colias croceusare) are regular migrants.
A good butterfly guidebook will help you identify all these species and where to find them, their habits as well as their habitats.
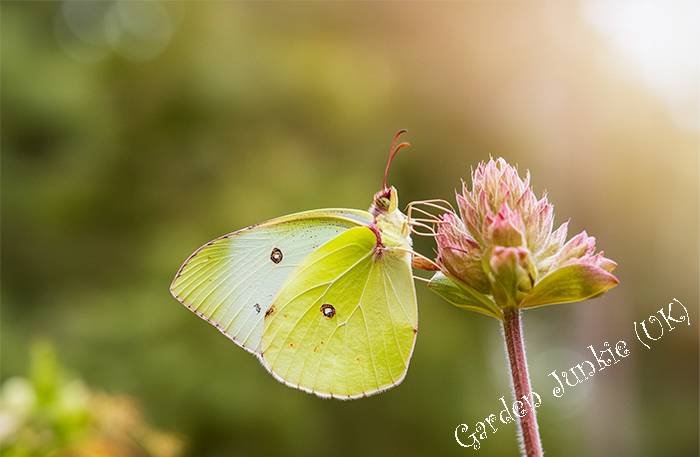
These super pollinators often frequent our outdoor spaces and domestic gardens, providing a great ‘benefit’ to gardeners through pollination and plant reproduction, but they also provide super splashes of colour for all to see and admire.
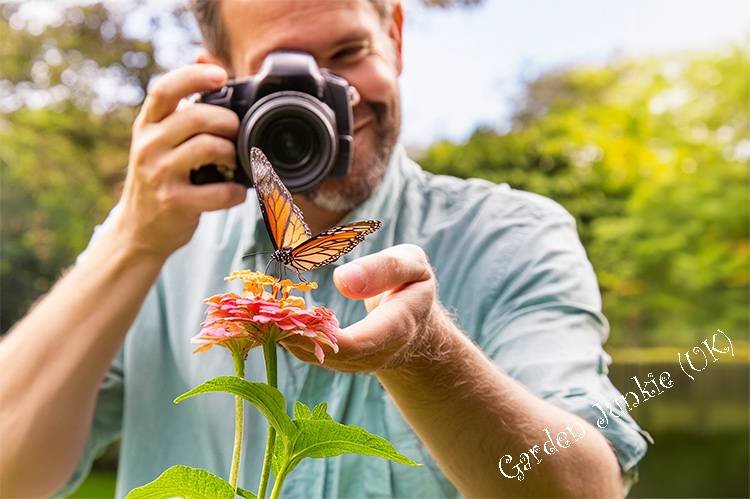
With butterflies in mind, are you new to photography? or if you’re looking for a new photography challenge? then why not try butterfly photography? Why you ask? Well, butterflies are beautiful and fascinating creatures that come in a variety of colours and patterns, and frequent many different environments, making them great interesting subjects to photograph.
With the right equipment and techniques as we will explore more below, you can capture stunning wildlife macro images of these delicate insects in flight, perched on flowers, or basking in the sun.
To get a good head start with butterfly photography, you’ll need a few key pieces of equipment to give you the ‘potential’ to take great butterfly photographs.
Ideally, and in a summary to get the best quality butterfly photographs you will need a camera. I recommend either a DSLR Digital Single Lens Reflex (cheapest) or a modern mirrorless camera both options can attach ‘different lenses’ as needed and in addition have the facility to adjust independently the aperture, ISO and shutter speed.
These cameras have a larger image sensor, than phone cameras or point-and-shoot cameras, thus allowing for better image quality and more control over depth of field, when using a ‘telephoto’ lens or dedicated ‘macro’ lens but these lenses are not essential as we shall discover. More on cameras and lenses later in the post.
You can also use a ‘dedicated flash‘ (not a ring flash though) combined with a flash diffuser to help control the lighting, which may come in handy when using certain techniques, for capturing those intricate details of butterfly wings and bodies. Again flashes are not essential, but we will discuss more about flashes and diffusers further down in the post.
Some people use a tripod, personally, I do not, I prefer ‘hand holding’ the camera when taking a shot because, by the time the tripod is ‘set up’ to take the photo (unless your subject is ‘static’ for any length of time), the butterfly or insect has often moved off elsewhere.
If you feel you need something solid to place the camera upon to help stabilise the shot, then I would suggest using a monopod for a quicker set-up and manoeuvrability. Once you have your equipment, it’s time to find some butterflies to photograph. However, before we do……..
With a plethora of cameras and camera manufacturers on the market, it is quite mind-boggling for any beginner taking up photography to know what to buy as far as a suitable camera is concerned. Of course, it will depend very much on your budget and what camera specifications you are interested in, ‘focus peaking’ as mentioned earlier for argument’s sake.
As I advised above, as long as you can adjust independently the aperture, ISO and shutter speed, any camera would be suitable to start. Canon and Nikon are still the major players in the DSLR market, although more people are moving away from DSLRs and moving towards mirrorless cameras whereas Sony, Canon and Nikon are the market leaders.
Just aside, and I will not get into it here as this is a topic on its own, but DSLRs and mirrorless cameras have both ‘Full Frame’ and ‘Crop Sensors’ versions, again either can be used for Butterfly photography and macro photography and both give excellent results. Suffice it to say ‘Full Frame Cameras though are more expensive.
What is a macro lens? Simply put macro lenses are specifically designed for close-up photography and have a magnification ratio of 1:1 or higher. This enables you to capture a small subject and fill the entire frame with it, ensuring that all of its intricate details are captured in the photograph.
In my opinion, a purpose-made ‘macro’ lens, is a must-have for spectacular butterfly and macro photography in general. A 90-105mm macro lens provides a good balance between ‘working distance’ and magnification. The Canon 100mm f2.8mm L the Nikkor 105mm f2.8mm and the 3rd party Sigma 105mm f2.8 or the Tamron 90mm F2.8 Macro Lens are all popular choices amongst macro photographers, taking butterfly photographs.
Just ensure you buy the correct mount if you purchase a 3rd party lens, ie.. if you have a Canon camera, the Sigma should be suitable to ‘mount’ your Canon camera, similarly for Nikon or other camera makes.
However, before we go any further, I feel I must give you all a quick ‘overview’ of lens apertures, as lenses are a ‘specialist subject’ in their own right and this is not a specific post about lenses.
Like many things, not all things are created equally, the same goes for lenses.
When you look to buy any lens, you will notice that besides options like the ‘nice to have’ ‘image stabilisation’ and ‘motor-driven’ autofocus, look for the lens’s F-stop range, which in my view is very important ie.. (F4.5 – F6.3). All lenses have F-stop ranges (or apertures) ranging from as low as F1.4 through to F32.
What does this F-stop mean? The lower the F-number the ‘wider’ the aperture or opening in the lens, which in turn lets in more light. The bigger the F-number the ‘smaller’ the aperture letting in less light.
Generally in ‘wildlife photography’ the subject we are currently discussing (butterfly photography) falls under both ‘macro’ and ‘wildlife photography’ genres. Photographers in both these genres tend to work in ‘lower’ light conditions at either end of the day for their best photographic results. Lenses with a working aperture (F-stop) range from about F4 – F16 is a well-balanced aperture range for most wildlife photographers irrespective of the focal length of the lens.
Lenses with lower F-stop range like F2.8, F4 and even F5.6 tend to be more expensive though, but they often offer superior images. To get a better grasp of lenses and lens apertures, read this post on understanding apertures in photography, keeping in mind the other factors we touched on above, ISO and shutter speed, as well as the aperture all go to make a well-exposed photograph.
If budget is a concern, then the purchase of a dedicated macro lens is not the only option open to you when wanting to undertake butterfly photography, certainly if you are new to the genre. Butterfly/Macro photography can be ‘effectively’ achieved using a standard (50mm) Canon Kit Lens for example, in combination with affordable 3rd party extension tubes. Again, a word of warning when purchasing, just make sure the extension tubes fit your camera’s mount.
Extension tubes are cylindrical, light-tight devices that are ‘inserted’ between the lens and the camera mount. By using an ‘extension tube’ or ‘combination’ of extension tubes, the lens is moved away from the camera body, including the front element of the lens. This adjustment allows for a ‘tighter’ focus with your standard lens on the subject and results in increased magnification.
Therefore, butterfly photography can be effectively achieved using standard kit lenses in combination with affordable extension tubes. This setup allows for a magnification range of 0.3x to 0.5x. It’s also worth noting that at these moderate magnifications, the depth of field (sharpness) is significantly greater compared to the 1x magnification attainable with dedicated macro lenses.
Telephoto lenses (fixed focal length) or telephoto ‘zoom’ lenses can be and often are ‘suitable’ for larger butterflies and other larger macro subjects, but they cannot focus (minimum focusing distance to subject) as closely as ‘macro’ lenses so provide less detail in the subject.
Although macro lenses can be (but not always) more costly, they offer superior detail for butterfly and macro photography.
However, what is one’s loss is one’s gain. Telephoto lenses within the 150-600mm range are effective. They allow you to capture images from a far greater distance from your ‘subject’ with less chance of disturbance than a macro lens, while still ensuring the subject appears reasonably large in the frame.
Just be aware it’s important to consider the lens’s minimum focusing distance when making your lens selection, as some telephoto lenses struggle to focus on close-up objects despite excelling at zooming in from a distance.
so if you find your chosen subject is highly active or skittish, a telephoto zoom lens, such as the 3rd party Tamron 150-600mm, or the Sigma 150-600mm may be a good choice, just make sure when choosing 3rd party lenses that it is suitable for your camera’s mount. Canon Telephoto Zoom, Nikon and Sony all offer ‘branded’ telephoto zooms but are generally more expensive than the 3rd party lenses mentioned above and certainly not necessary, especially if you are just starting. However, no doubt budget and personal preferences will determine your lens choice.
If you choose to use a telephoto lens, a lightweight tripod or monopod should be used for butterfly photography as it helps to stabilise the camera and reduces ‘camera shake’, resulting in sharper images. K&F concepts have a super combination lightweight tripod/monopod that would be perfect if using telephoto lenses.
Butterfly photography is a specialised form of wildlife photography, it can be generalised as a macro or close-up photography genre. This ‘genre’ of photography like all other photography genres requires a general understanding of some ‘essential’ photographic concepts.
To capture good photographs of butterflies, you will need to know all about your camera settings, (shutter speed, ISO and aperture) lighting and how these affect the end product, the photo.
To help you understand these essential concepts and how they will affect your photographs, photographers use what is called the exposure triangle to set their camera and lens settings accordingly to take their photographs and give them the results they require.
I strongly recommend you read your camera’s manual in conjunction with the information about the ‘exposure triangle’ and be familiar with both before proceeding further with your butterfly photography.
Hopefully, at this point, you will know by now camera settings play a ‘crucial’ role in photography and butterfly photography is no different. You know you will need to set the ISO, shutter speed, and aperture correctly to capture the perfect shot.
I prefer to work in ‘manual modes’ when photographing butterflies or any insects for that matter. This mode on your camera (M) provides you with greater control over the end image. Similarly, if you have a separate mounted flash you should use (M) also on the flash, not TTL metering modes. You can read a bit more about general wildlife photography camera settings to help you understand ‘camera modes’ further.
Generally, though a high ISO setting can help you capture sharp images in low-light conditions without a flash. A fast shutter speed can freeze the motion of the butterfly, while a wide aperture can create a shallow depth of field or bokeh, meaning the ‘blurring of the background’ and making the butterfly stand out.
I suggest you try and start with some basic’ free-hand’ settings, which I will set out in the table below. However, I encourage you to experiment with different settings to see what works best for you, as different cameras, lenses, ISO, whether you use a flash, the weather and time of day all play a vital role in creating a great butterfly photograph.
Try and experiment with these camera settings in the table as set out below for your butterfly photography and macro photography generally.
| Shutter Speed | Aperture | ISO | Flash Power |
|---|---|---|---|
| With flash 1/30s – 1/250s Without flash – 1/200s or faster | With flash f5.6 – f11 Without flash f2.8 – f5.6 | With flash 100 – 200 Without flash 200 – 800 | Manual mode Strength: 1/16 power You can adjust +/- as needed |

In addition to camera and flash settings, one of the most ‘important aspects’ of butterfly photography is getting the ‘focus’ just right. When photographing butterflies, as discussed above I prefer to use manual mode for all aspects of the photographic process to give the control you need for a great shot, focusing is no different.
As you can see in the table above, manually set the shutter speed, between 1/30s or faster depending on your lens and your use of a ‘flash’ or not. Manually set the aperture value between f/5.6 to f/11 and manually set the ISO between 100-800, depending on the situation and the use of flash as well.
Note: As a rule of thumb, if hand-holding the camera, try and keep the ‘shutter speed’ equivalent to or faster than your lens focal length. For example, if you are using a 100mm macro lens the shutter speed should be manually set at 1/125sec or faster. Similarly, if you are using say a 400mm telephoto lens then the shutter speed should be set to 1/500sec or faster. This ensures less chance of a blurry photo due to ‘camera shake’. Using a flash, however, negates this issue of camera shake.
Hopefully, at this point, you have understood some photography concepts explained in the links I provided earlier, so camera settings should become a little more self-explanatory and you can set them somewhere near correct to expose the photograph correctly.
Now when taking photographs, try to position your camera so it’s ‘parallel’ to the butterfly’s wings (I know it’s not always possible) to ensure that the ‘focus‘ is on the butterfly’s eyes and or body. Now ‘manually’ rotate and ‘focus’ the lens back and forth while looking through the viewfinder or preferably on the camera’s back screen, normally called ‘live view’ on many cameras, until the subject becomes sharp enough to take the photo.
Sometimes, I manually focus, stop when it’s near enough sharp and then move my body gently and ever so slightly backward or forward to ensure ‘perfect’ sharpness, all the while looking at my screen before taking the shot.
If you are buying a new camera, then you will find many modern cameras have a facility to help you with focusing generally called ‘focus peaking’ which is also a great help in butterfly photography. Find out more about focus peaking and how it can help you get pin-sharp photos.
When composing your shot, consider the ‘rule of thirds‘ to create a balanced and visually pleasing photograph. Experiment with different angles to capture the butterfly from different perspectives. Try shooting from above, below, or at eye level to create a dynamic and interesting image.
What is bokeh? Bokeh is a technique which can help to ‘isolate’ your subject from the background and create a dreamy and ethereal effect in your photograph.
Creating a shallow ‘depth of field’ can help to create this beautiful ‘bokeh’ effect in the background of your photograph.
Background and depth are important factors to consider when taking butterfly photos. A shallow depth of field can be achieved by using a wide aperture, such as f/2.8 or f/4, and positioning your subject at a distance from the background.
Using such a wide aperture (a low f-stop number) will blur the background and put the ‘focus’ on the butterfly or subject. This will create that shallow depth of field, which can add a sense of depth and dimensionality to your photo.
We looked at camera settings for our butterfly photography, now let’s take a quick look at ‘flashes’ and flash diffusers, do we need them? The answer is yes and no.
When your subject is in motion as butterflies often are, then generally, it’s important to use ‘fast shutter’ ‘speeds to capture sharp images without making the images too dark. However, in lower light conditions, you may need to adjust other settings such as aperture, (depth-of-field) and ISO to compensate, which can often introduce ‘noise‘ into your photograph.
Using a ‘flash’ can quickly help solve this problem by providing the necessary ‘light’ to freeze the movement without sacrificing the overall camera settings and composition.
Moving subjects encompass more than just flying or fluttering insects. Even the gentlest breeze can cause a flower or leaf to sway while photographing your subject. Longer exposures in these scenarios raise the potential for ‘motion blur’ and ‘camera shake’. This is particularly critical when photographing small subjects in macro photography, where maximum sharpness and clarity are essential.
By using a ‘flash’ you can ‘freeze’ the action and reduce the shutter speed to avoid camera shake. Reduce ISO’s to lower the noise (graininess) in your photo and using a flash can also help those photo colours pop. Third-party off-camera flash guns are reasonably cheap and effective in providing the necessary ‘light’ needed for butterfly and macro photography.
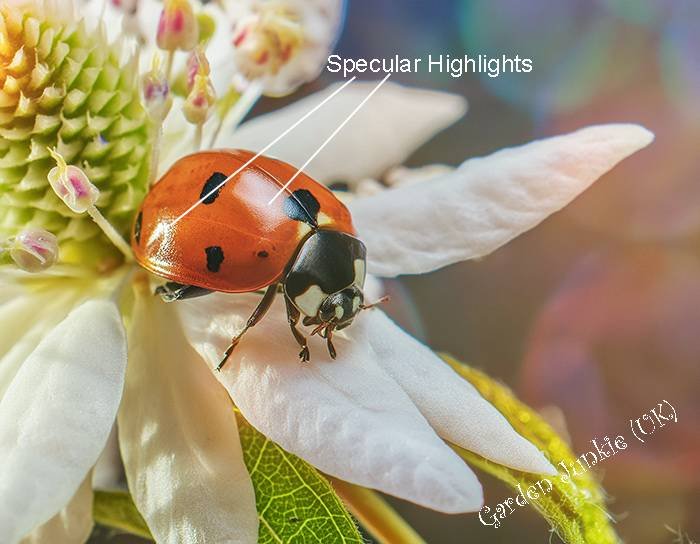
There is a slight ‘downside’ to using a ‘flash only’ in butterfly photography or macro photography and that is ‘specular highlights’. Specular highlights are bright spots of light that show on the reflective parts of your image. To combat this you will need a flash diffuser.
A flash diffuser is a valuable tool for butterfly and macro photography generally, as it offers several advantages. It helps to soften the light, reduce harsh highlights, and combats ‘specular highlights’ on reflective surfaces, particularly common when photographing many types of hard-shelled insects. Additionally, it aids in directing the light towards the ‘macro lens’ and subject.
When capturing moving subjects in macro photography, using a ‘flash’ is necessary to avoid camera shake as we have seen. In such cases, using a flash diffuser is essential to achieve even lighting and ensure that the ‘maximum details’ and textures of the subject are captured in the photo.
Therefore, photographing highly reflective and shiny subjects can be particularly challenging when using an ‘undiffused’ flash. Using a flash diffuser helps to address this challenge.
Lighting and time of day are important factors to consider in butterfly photography. Natural light is undoubtedly the best source of light (no flash) for butterfly photography if conditions are right, however, it does have its limits, but using a ‘flash’ is equally as good in many cases.
Early mornings are the best times to capture butterflies as they are usually less active during this time. The soft light of the early morning can create a magical atmosphere for your photographs.
In summary, understanding the essential concepts of butterfly photography, camera settings, lighting and time of day can help you capture stunning photographs of butterflies. With the right settings and lighting, you can create beautiful images that showcase the beauty and grace of these amazing creatures.
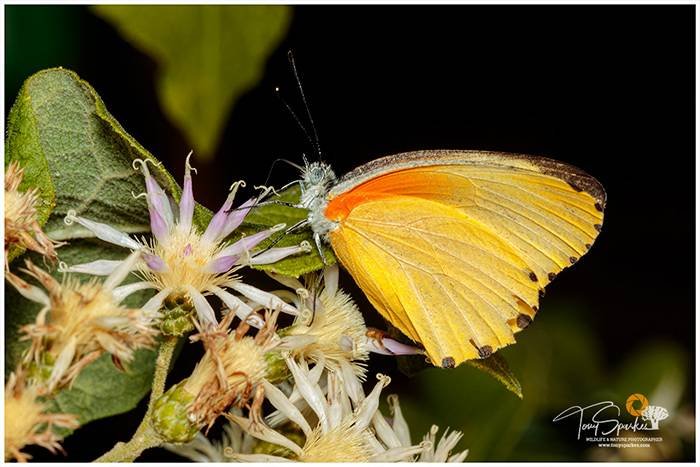
Butterflies can be found in a variety of habitats, including gardens, meadows, heaths, grasslands, wetlands and chalk downlands. Meadow browns, (Maniola jurtina) for example, can often be found in meadows and grasslands, while the Common Blue (Polyommatus icarus) often prefers coastal dunes and downlands.
When looking for butterflies, it’s important to pay attention to your surroundings. Butterflies are attracted to gardens, plants and trees Look for areas with a lot of flowers, or flowering trees and shrubs, as butterflies feed on nectar and are attracted to bright colours.
When photographing butterflies, it’s important to work with the natural elements in your surroundings. Pay attention to the background of your shot, and try to find a background that complements the butterfly’s colours and patterns.
Be patient and observant, as butterflies can be elusive and may require some time and effort to find. By understanding the butterfly’s environment and working with natural elements in your surroundings, you can capture stunning butterfly photographs that truly showcase the beauty of these delicate creatures.
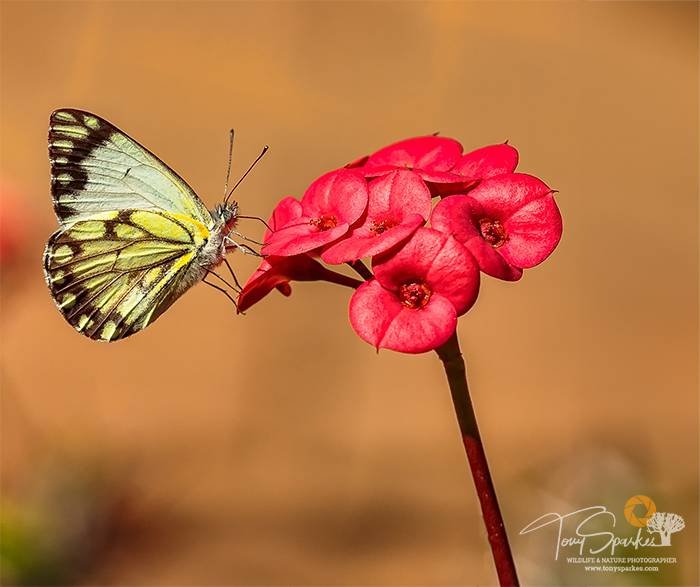
In addition to the background, pay attention to the plants and flowers in your shot. A butterfly perched on a beautiful flower can make for a stunning photograph.
Consider the time of year and the weather conditions. Butterflies are more active in the summer and spring months and are more likely to be out on warm, sunny days. Keep this in mind when planning your photography outings. However, The best time I find to look for and photograph butterflies is early in the morning or the early evening when they are less active and less inclined to fly off and the lighting is soft, making them easier to photograph.
Once you’ve spotted a butterfly, approach it slowly and quietly, being careful not to startle it. With practice and perseverance, you’ll be able to capture stunning images of these beautiful and fascinating creatures.
When it comes to editing butterfly photographs, there are a variety of software options available. Adobe Photoshop and Lightroom are popular choices, but there are also free alternatives like GIMP and RawTherapee.
One important technique to keep in mind is adjusting the white balance. This can help correct any colour casts that may have been present when you took the photo. You can also adjust the exposure, contrast, and saturation to bring out the best in your butterfly photos.
Another useful editing technique is cropping. This can help you focus on specific details of the butterfly, such as its wings or antennae. It can also help you remove any distracting elements from the background of the photo.
To enhance the details in your butterfly photographs, you can use a variety of techniques. One option is to use ‘sharpening’ tools in your editing software to bring out the details in the butterfly’s wings.
Another technique is to use selective focus. This involves focusing on specific areas of the butterfly, such as its eyes or wings while ‘blurring’ the rest of the photo. This can create a more dynamic and visually interesting image.
You can also use contrast adjustments to bring out the details in the butterfly’s patterns and textures. This can help make the photo more visually striking and engaging.
If you’re looking to capture stunning butterfly photos, you may want to attract them to your garden. Butterflies are attracted to nectar, so planting nectar-rich flowers is a great way to bring them to your garden, we’ll cover some tips for creating a butterfly-friendly environment and best practices for attraction.
Butterflies are certainly attracted to flowers with bright colours and strong scents. Planting your gardens for wildlife with a variety of flowers that bloom at different times of the year will help attract a wide range of butterfly species. Some nectar-rich flowers that attract butterflies include buddleia, lavender, marigold, and verbena.
In addition to flowers, butterflies also need a place to rest and lay their eggs. Providing a butterfly house or sheltered area will give them a safe place to rest and lay their eggs. You can also plant host plants that caterpillars feed on, such as milkweed, to attract certain butterfly species.
To attract butterflies to your garden, creating a pesticide-free environment is important. Pesticides can harm butterflies and their larvae, so it’s best to avoid them altogether. Instead, opt for natural pest control methods such as companion planting or ‘handpicking’ pests from your plants.
Another way to attract butterflies is to provide a shallow dish of water. Butterflies need water to drink and to regulate their body temperature, so providing a water source will encourage them to visit your garden.
In summary, creating a butterfly-friendly environment with nectar-rich flowers, host plants, butterfly houses, and a pesticide-free environment will help attract butterflies to your garden for stunning photography opportunities.
Butterflies are important pollinators and play a vital role in maintaining the balance of ecosystems. As a wildlife photographer, you can contribute to their conservation by raising awareness of their importance and the threats they face. Share your photographs with others and use them to educate people about the beauty and importance of these winged creatures.
You can also contribute to conservation efforts by supporting organisations that work to protect butterfly habitats and populations. Butterfly Conservation is one such organisation that works to conserve butterflies and moths in the UK. By donating to organisations like these, you can help to ensure that these beautiful creatures continue to thrive for generations to come.
Prioritise the butterfly’s well-being. Avoid chasing them or stressing them out. Focus on photographing butterflies already resting on flowers or basking in the sun.
While butterflies themselves are generally harmless, be cautious in their natural habitat. Watch out for ‘stinging insects’ like bees and wasps, and be mindful of potential hazards like uneven terrain or poisonous plants.
Wearing neutral-coloured clothing can help you blend into the environment and avoid startling butterflies. Remain still and patient, allowing them to become accustomed to your presence before attempting close-up shots.
In conclusion, butterfly photography can be a rewarding and enriching pursuit for beginners. Equipping oneself with the right gear, such as a macro lens and a flash, can enhance the quality of images and enable close-up shots of these exquisite creatures.
Employing techniques like patience, observation, and understanding butterfly behaviour can lead to stunning and evocative butterfly photographs. Moreover, beginners can benefit from learning about the natural habitats and behaviours of butterflies to capture them in their most authentic and captivating moments.
With a bit of dedication and practice, novice photographers can develop a deep appreciation for the art of butterfly photography and the beauty of the natural world.
Should you want to explore butterfly photography further there are plenty of Butterfly Photography YouTube videos available for you to watch and learn from.